

Implementing Refresh Tokens in Next.js with NextAuth.js and Okta
Preface: This is the third article in the NextAuth.js series if you need support with other parts of the NextAuth.js setup in Next.js, check out these articles:
- Adding Authentication to Next.js with NextAuth.js and Okta
- Accessing JWT and Session Data in NextAuth.js with Callbacks (Okta Example)
In web authentication, refresh tokens play an important role in maintaining user sessions and enhancing the security of your application. This article starts with the What and Why of refresh tokens and then gives the example of implementing them in NextAuth.js with Okta as the authentication provider.
What are refresh tokens?
A refresh token is a long-lived credential used to obtain a new access token after it expires. Access tokens are short-lived and provide limited access rights to protected resources. When an access token expires, instead of requesting the user's credentials again, a refresh token can be used to obtain a new access token without requiring the user to re-authenticate.
I only showed how to get the access tokens in my previous articles. That’s fine, but if you want to allow users to stay logged in without re-authenticating, you’ll want to implement the logic for refresh tokens.
Why are refresh tokens necessary?
- Enhanced Security: Refresh tokens enhance your security by allowing you to refresh your access tokens. If an access token becomes compromised, the damage is limited because it will expire and must be refreshed. Refresh tokens last longer than access tokens but cannot be used to access your sensitive assets directly.
- Improved User Experience: As mentioned, refresh tokens allow users to be logged in for extended periods without logging in again. This is the biggest reason I added refresh token logic to my application. Users felt that they were getting logged out too quickly.
Implementing Refresh Tokens in NextAuth.js with Okta
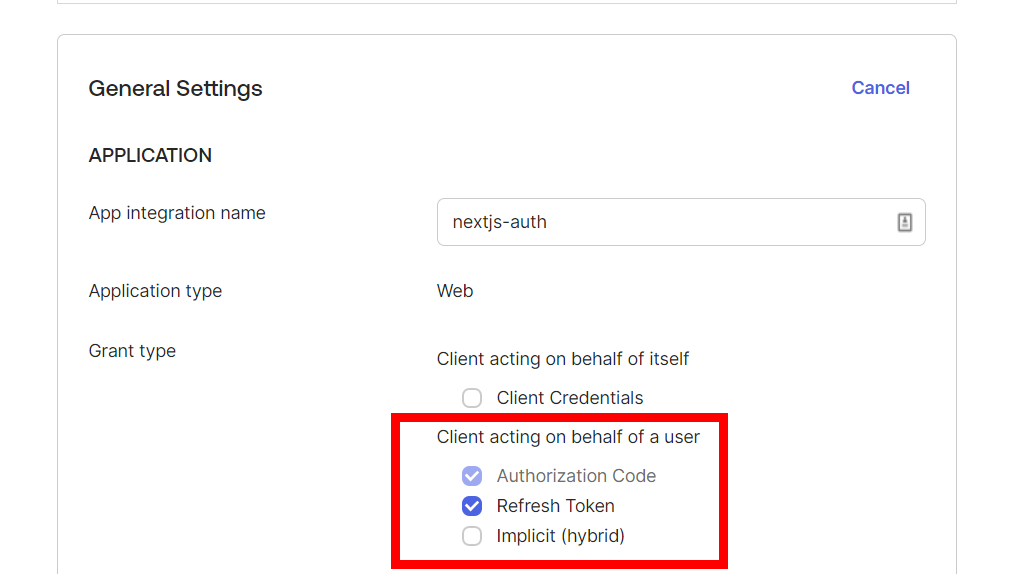
1. Ensure Refresh Token is a Grant Type for your application
Before you can do anything with refresh tokens, you need to ensure they are enabled for your application in Okta. Log into Okta and go to the application that you are working with. In the General Settings tab and General Settings card, you will see a Grant Type section. Make sure you have Refresh Token checked and saved.
2. Extending the Okta Provider
Now let’s get into the code. The first thing we will need to do is extend the authorization property for Okta. Specifically, the scope property within authorization to include the offline_access attribute. Your Okta provider should be in this file: pages/api/auth/[...nextauth].ts.
1providers: [
2        Okta({
3            idToken: true,
4            clientId: process.env.OKTA_CLIENTID as string,
5            clientSecret: process.env.OKTA_CLIENTSECRET as string,
6            issuer: process.env.OKTA_DOMAIN as string,
7            authorization: {
8              params: {
9                scope: "openid email profile offline_access"
10              }
11            }
12        })
13    ],
scope is the information that you are requesting from the provider. You need a refresh token to be included in the request to Okta so you add offline_access. Check out the Refresh Access Tokens documentation on Okta for more information on the offline_access property.
By default, scope is set to openid email profile so if you didn’t have the property before that is what it was defaulting to. You are now extending it to include the offline_access property (NextAuth.js file with default scope set for Okta).
3. Refreshing the access token in the JWT callback
If you are familiar with my previous article, Accessing JWT and Session Data in NextAuth.js with Callbacks, the below may look familiar.
Changes:
- The new
elsestatement, on line 14, was added to handle refreshing an expired access token. - In the first if statement, you need to store the returned
refresh_tokeninto the token object that gets returned later in the method. You can see this assignment happen on line 6 below.
This, again should be inside of your pages/api/auth/[...nextauth].ts file.
1async jwt({ token, account }: any) {
2	if (account) {
3	    token.accessToken = account.access_token;
4	    token.idToken = account.id_token;
5	    token.oktaId = account.providerAccountId;
6	    token.refreshToken = account.refresh_token;
7	}
8
9	var tokenParsed = JSON.parse(Buffer.from(token.idToken.split('.')[1], 'base64').toString());
10	const dateNowInSeconds = new Date().getTime() / 1000
11	const tokenIsNotExpired = dateNowInSeconds < tokenParsed.exp;
12	if (tokenIsNotExpired) {
13	    return token;
14	} else {
15	    const url = `${process.env.OKTA_DOMAIN}/v1/token`;
16	    const body = `grant_type=refresh_token&client_id=${process.env.OKTA_CLIENTID}&client_secret=${process.env.OKTA_CLIENTSECRET}&refresh_token=${token.refreshToken}`;
17	    const headers = {
18	        'Content-Type': 'application/x-www-form-urlencoded',
19	        'Accept': 'application/json'
20	    };
21	    const response = await fetch(url, { method: 'POST', body, headers });
22	    const data = await response.json();
23	    if (data.error) {
24	        throw new Error("Unable to refresh token");
25	    }
26
27		// Only need to refresh id/access token with new refresh token not oktaId since it's not returned
28		if (data && data.success) {
29				token.accessToken = data.access_token;
30				token.idToken = data.id_token;
31				token.refreshToken = data.refresh_token;
32		}
33
34	    return token;
35	}
36},
The flow above is to check if the access_token is expired, and if it is, use the previously stored refresh_token to get a new valid access_token from Okta. To get the new access_token you call the following endpoint: https://okta.sitecore.com/oauth2/default/v1/token. Check out the Okta API Docs for more information on the /token endpoint.
Once the response returns successfully, you can set your new token values and return that token for authentication.
That’s it. Refresh tokens with Next.js, NextAuth.js, and Okta in your application. By adding the offline_access to your scope you got access to your Okta refresh token. You then used that refresh token to get a new access token. Nice!
If you run into issues, check out how I set up authentication in my previous articles or reach out to me on Twitter or LinkedIn.